Wednesday 19 December 2012

A Little Home Decor for the Holidays...

Whilst trawling Youtube the other day, I came across a video teaching how to make antique book paper wreaths. Well, I didn't have any antique books to hand, but I DID have a really old, tatty Joanna Trollope book which I was more than happy to take off my book shelf! Here's what I made:
I'm soooooo pleased with how it turned out! The instructional video said to make 120 cones from the book pages, which I laboriously did; only to find that I had about 30 left at the end of my project!! So... what to do with 30 paper cones? Well, make another wreath, of course! This meant that I could place one on either side of the arch in our living room. As well as looking prettier, it meant that the rather tatty backing for each wreath was hidden too! Let me show you a close up:
To fill the centre, I literally scoured the house! I knew I wanted to fill it with neutral and soft gold things - you'll be surprised what you can find! A cork from a bottle of wine we'd had the night before, a little wooden ball from a bowl of everyday decor in our living room, some paper flowers from my stash, lightly misted with kraft and gold spray... you get the idea!
I really recommend making one of these - from start to finish, making one of the wreaths took a couple of hours... not long if you consider how long it takes to make a layout! Go take a look on Youtube, searching for 'antique book paper wreaths' - there's lots of vids to choose from - all with pretty similar instructions - hope you like! xxx

Sunday 16 December 2012

Pages From Christmas Album 2012

Hey girls... as promised, here is some inspiration for decorating the inside of those albums!


As I tend to take my photos using Instagram these days, I've made my photo mats square - slightly larger than two inches. This allows me to print 6 Instagram photos on one 4x6 piece of photo paper. So, have fun - can't wait to see them all finished in January!
P.s - I THINK I may have fixed the comments issue we were having on my blog, so do please try and leave a comment!

Saturday 15 December 2012

Thank You!

A thank you to all that come and join me throughout the year to play with paper - and a huge wish for a happy healthy Christmas and New Year to you all.
I'll take piccies of the inside of our album tomorrow and pop them on the blog to inspire you all to finish that final project!
And well done every one - I worked you like Trojans - and you all met the challenge!
See you all in 2013! xxx

Wednesday 12 December 2012

The Biggy...

I know how you all love to make an album or two...


...So here's one for you to get your teeth into! At first glance, this looks  like an ordinary, cute little album, but see that small red tab at the bottom? That does something pretty neat!

So, I mentioned in a previous post, that it would be helpful for you to bring along a few things to speed things up; of course, if you don't have them, then everything you need is here - but let's try to avoid queues for the ink pad!! Here's the list:
A sanding block/nail file
Strong white glue (preferably with a fine tip applicator)
Hot glue gun
Strong double sided tape (red liner etc)
Glossy Accents
Brown ink and a sponge for inking edges
Black ink
3D foam pads
Red pen/ink to colour the white letters in kit
Any punches/stamps you own that you may wish to incorporate
See you all later in the week - really looking forward to it! xxx


Tuesday 11 December 2012

Your Penultimate Teaser!!

Here it is:


A bit of stamping here, some of those hand made buttons (much more sparkly in real life!) and a bit of paper engineering!

So, you've worked out that there are 5 projects... the biggy to come tomorrow. This month, I'll be working along with you, step by step. i reckon we should get most of it done that way! As always, you'll have your written instructions to take home, so panic not!

See you tomorrow, with the last teaser, and a list of supplies you may wish to bring. xxx

Monday 10 December 2012

Another Teaser...

Here's your third teaser for our Christmas crafting session:


I really enjoyed making this; I hope you will too! It uses that beautiful flower, made from crinoline and burlap which I showed you in a previous post. You can use this one in your own home for the festive season, or give it as a gift - the choice is yours! xxx

Sunday 9 December 2012

Your L'il Old Chrimbo Gift From Me...

Now - if you can see what this is, then you really do deserve a prize!!


Happy Christmas!! xxx

Extra Goodies...

I just have to share all the extra goodies I've added to your kits! Look at all this lushness:


See the pretty flower? Sweet heh? A few vellum pockets, (well... you just KNOW there'll be a mini album of sorts built into the day!) home made sparkly buttons, twine, wooden snowflakes, tags and tabs, letters, beads, a hat pin.... you get the idea! xxx

Another Christmas Craft Session Teaser...

Here's another little something we'll be making...


If you have any guesses as to what this may be... i'd love to hear them!! Keep checking back for more tempting teasers for what's in the pipeline next week... xxx

Friday 7 December 2012

A Little Teaser for My Girls.....

Hello all, I hope December is treating you all well, and the Crimbo stress isn't kicking in too hard!! Through this week and next, I'll be posting little teasers of what we'll be doing next week, rather than full on piccies of our makes... thought it may be more fun that way!!
So here's the first:


How cute is that?!?!
About the middle of next week, I'll post a list of anything specific you need to bring along, so do keep checking back! Hope you like! xxx

Wednesday 21 November 2012

PAPER-CUTS November 2012 Project Share

Oooooookaaaaay... as always, we'll be making a card (always handy to have a few card techniques up your sleeve, I think). Here it is:


I've used an embossing folder (a TRIPLE embossing folder no less - get me) to create those adorable hearts on stems along the bottom, and then it was simply a case of arranging those left over bits and pieces from the layouts into a pleasing design! And yes - those little embossed hearts at the bottom have been coloured in with a glittery red pen, but fear not - if you don't feel up to the challenge, well then that's what I'm here for; or of course, you could leave them plain!

And finally, talking of left over bits and pieces, check out our final project:


I know one certain lady who will be tickled pink that we're creating something in the dress form shape (;-D), and in this instance, it's a tag. Now... if you look closely, you'll see that I've machine stitched all of those strips of patterned paper onto the base card before die cutting the dress form shape. A classic case of lack of fore thought, as once the shape was cut and embellished, you'd hardly know those stitches were there, so rest assured we WON'T be getting the sewing machine out! If you like the look of the stitches however, there's always the option of doodling or stamping the stitch lines, I'll leave that up to you!

Anything you need to bring along for these projects? Some double sided tape would be useful and some strong glue to hold that cluster of embellishments onto the tag would be good. Other than that, it's all here at your disposal! Oh, and please remember, that if you're new, and you don't have a lot of kit yet, that's not a problem - everything you need is here to use until you get yourself up and running!

So, that's it then - I'm off to write up your instructions - not QUITE as much fun as creating the projects! Can you all keep your finger's crossed that my printer will play nicely this month...  see you all in a few days!  xxx

Tuesday 20 November 2012

PAPER-CUTS November 2012

Hello everybody, I hope your day is treating you well! Without further ado, here's the first layout that we will be making this weekend:


A little different to my usual style this one, but I really enjoyed getting experimental with the various papers in the kit! One thing to note; there are no alpha stickers in this month's kit so you may want to bring along the alpha stickers that we had last month, or you can get experimental with the many different stamps I have here to create a title, as I have done!
I'm particularly pleased with the little cluster of embellishments in the right bottom corner of this layout. I think you'll have great fun creating something similar!
So, things you need to bring along; stickers (if you want to use them for your title), fine detail scissors, some black card stock to mount your photos and your title and some 3-D foam pads to allow your photos to sit above the wooden hexagon embellishment.

The second layout we'll be making, is I think my favourite this month. Here it is below:


Again, no letters stickers this month, so again, more ingenuity with stamps! The clusters of embellishments are slightly more complicated in this layout, but as always, you'll have your hand-outs with images of the layouts and written instructions to follow. Before you think  "Oh no! Quite a lot of stamping and cutting to get through", fear not -  I've been kind and done quite a lot of it for you. Obviously I haven't wanted to cut into the papers in your kits, but the stamped images which needed cutting from kraft or cream card stock will be waiting in your kits!
Anything else to bring along for this one? Ummm.... having a close look at it as I type..... no! Obviously, if you want to bring along your own ink pads/mounting blocks etc, that just speeds things up for you, but nothing else is needed.

So that's it for now, I'm off to create a card and a little something rather special with what's left from our November kits. Check out the blog tomorrow!

Tuesday 6 November 2012

November Kit Available to View!

A quickie for all my PAPER-CUTS girls, this months kit is available to view HERE. It's just arrived, and I think it's going to be wonderful to work with (with a few little additions from me, of course!) I'll keep you posted as I create! xxx

Lastest Issue of Scrap365 Available Now!


Hello all, just to let you know that the new Scrap365 is available very soon! As always, lots of lovely inspiration for you to enjoy xxx


Tuesday 16 October 2012

PAPER-CUTS, Final Project!

The last thing we'll be making is this sweet tag:
Now, apologies for the not so great photo... the light was fading and I had to pick the kids up so was in a bit of a hurry!
To bring confetti into this project I've used a couple of star punches and some glitter - the specific technique will be revealed within your instruction sheets! Also, note those letters which spell 'gift'. They are the red ones from your sticker sheet simply coloured with a black Sharpie pen, which of course, makes them so versatile for projects to come. The other thing I think you'll love is the little tag I've added to your kits. It's made from Heidi Swapp Colour Magic paper - something I'll be willing to bet you'll want to buy once you've tried it!
You won't need to bring anything extra for this project, other than what's already been mentioned. That is, unless, you are very messy with loose glitter - in which case you'd better bring along your dustpan and brush!
Right then - off to experiment with those buttons I mentioned in my first post...
Hope you like! xxx

PAPER-CUTS Part Three...

Ok... it's card time! I'm quite liking creating a card each month - you can never have too many after all! Here's this month's offering from the kit, again, continuing with the confetti theme:
Now, personally, I think that's one cute card! This time, the confetti is contained in a sweet little glassine bag, decorated with other bits from our kits. If you missed it in the first post, you can view the kits from Papermaze HERE. I've added a few bits for you to make this one - obviously a card base and envelope, the glassine bag and a lovely speech bubble die cut to colour as you wish. Things you may wish to bring along? Definitely some 3D foam pads, if possible of two differing thicknesses; some sort of clear adhesive (we attach all that heart confetti to a piece of vellum inside the bag - this stops it from bunching up at the bottom), I've got some double-sided tape, but it's not QUITE clear so if you have something better - do bring it along. And that's it!
Right, off to create our fourth and final project, which is going to be a tag. I wonder what else one can possibly do with confetti.....
Hope you like! xxx

PAPER-CUTS Part Two!

Right then, here's our second layout - continuing with the confetti theme:
See those three starbursts with the heart shaped confetti? Those are made by sandwiching punched out hearts between two layers of packing tape - cute or what??
So that's the main focus of this layout. You'll like this one though, as there's no other measuring involved - all of the papers have been torn to size using the edge of your ruler,  just judging the size you want with your eye. AND... you can use a 4"x6" photo, whilst following the example exactly - that'll make a pleasant change for you!
Things to bring along? A ruler; Any punches you like that have at least 3 variations in size to the same shape; 3D foam pads; A fine liner black pen (doodling around those confetti starbursts really helps to focus the eye on them).
Keep checking for part three! Hope you like. xxx

Monday 15 October 2012

PAPER-CUTS October 2012

Hello everyone - hope this blog entry finds you all well and (for those of you that attend) raring to go for this month's class! As always, you can see the kit HERE.
Continuing on with our theme of exploring popular trends in the scrapbooking world, this month we're looking at confetti!
Without further ado - here's the first layout you'll receive instructions for; apologies for the poor lighting - have you seen the weather today? :-(
I think you've all probably noticed, that I'm loving using small photos at the moment - another popular trend actually (bonus!). For this layout, I think a standard 4"x6" print would just be too large as we want to maintain as much of that white space as possible. If you don't have the facility to create a 2"x3" photo such as mine, don't worry - just bring along a photo that we can cut down to a smaller size.
I intended to create those cute little buttons for you all, but since using these ones, I've discovered that they're very brittle! I'll attempt to alter the ingredients list in my melting pot and see if I can improve them, but to be safe, if you want to use buttons and have some at home that co-ordinate, then do please bring them along.
Other bits and pieces that'll help you are: A glue pen or liquid glue with a very fine tip; A pick me up tool if you have one; A pair of fine detail scissors.
OK - that's project number 1... project 2 coming soon!
Hope you like!. xxx

Thursday 20 September 2012

PAPER-CUTS September 2012 Final Offerings...

Still on a kick with the layering...
This little card was very quick and simple to make. Note the label in the middle with the stamping on it? that's made by cutting out the centre of one of the journalling cards and layering a neutral pattern behind it before stamping the sentiment. And I think the paper bag butterflies add a cute touch!

The final make (and I think my favourite) is this:
The paper bag comes in your kit (I cut off a chunk from the top to use as layers on both the scrapbook pages). That still left a bag PLENTY big enough to house a gift for a very special person! The layering here involves a hand made mask, stippled pink paint, splattering of said paint and glimmer mist and a whole lot more fussy cutting of the journalling cards! See the silver label behind the large butterfly? That's cut from the middle of the tag on the second layout - no point in wasting it if it can't be seen!
Here's a close up:
The butterfly is inked, then when dry, stamped with Versamark and a doily stamp. I then added an embossing powder which goes sticky when heated, added some glitter before heating again - ta da! Beautiful glittery doilies! Note again those paper bag punched butterflies - they look lovely on the backing they were made from!
So, nothing much to bring along to make these two - perhaps some of your favourite sentiment stamps if you have any, oh, and an edge distresser may speed things up a little. 
So, see you all this weekend... hope you like! xxx

Wednesday 19 September 2012

PAPER-CUTS September Take Two...

And yet more layering...

this time, layering with stamped borders, more paper, mica powder and Distress embossing powders.  Another girly layout, but I think that's what the kit was calling to me! Again, lots of detail in this one, from the altered chipboard letters, to the beautiful glittered butterflies. Ooh and see the shipping tag behind the photo mat? That started life as a dull ol' brown tag... amazing what a little Versamark and mica powder will do!
Here's a little close up:

If you have mica powders, glitter, wet glue or versa mark at home, you may wish to bring them along to prevent having to stand in queue! And again, some chipboard alphas never look amiss when adding an extra bit of dimension.
Hope you like! xxx

PAPER-CUTS September 2012

Layers.... lots and lots of lovely layers...
This month's kit is feminine, floral and flouncy. If you want to see the kit in detail, go to http://www.papermaze.co.uk/product/kits/papermaze-september-kit. I decided that the technique of layering would suit the kit very well, so that's what we're covering this month!
Layering is very popular at the moment, be it with paper, masks or stamps, so I thought we'd cover all three! There's lots of detail in this layout, and therefore lots of techniques, so hopefully there'll be something new for everyone to learn in this one!

Here's a little close up of some of the detail:
I've created the title with the Silhouette, if you don't have any large alphas, then you can do exactly the same sort of thing with the Cricut, so have a think of any title you may wish to use. If you have any mists, favourite stamps for backgrounds (see the text in the hearts) and Frayed Burlap Distress ink and sponges you may want to bring them along to speed things up a little. Also - see that heart shape in the background? That is a Heidi Swapp mask that we received in our kits many moons ago... if you can find it, bring it along too!
One last thing, part of the kit includes 6 beautiful note cards from Prima. If you want to use these as layers (as I have done), you may want to choose a photo that you can crop down a little - a 4x6 photo would not fit quite so well on them.
Rightyho... on to project number 2 - another layout. I'm hoping to create something else too, but I think I'll keep that as a surprise for when you arrive!
Hope you like! xxx

Thursday 23 August 2012

PAPER-CUTS August 2012 Final offerings!

Good morning! OK... I'm down to a couple of scraps of paper and the embellishments are all used save a few rub ons, so I think it's fair to say that the kit has been put to good use! Here's the final layout:
Again, you'll notice the sun ray theme - this time appearing as a negative cut into the paper. I'm afraid for this one you do need to bring a little extra something - some kraft card stock. If you have any alpha stickers, bring them along for your title. If you have none, we can cut them with the Cricut. Ooh, and a little twine/thread finishes off the buttons and hat pin nicely, but isn't essential!
So ladies - see you tomorrow/Saturday - looking forward to it!
Hope you like! xxx

Tuesday 21 August 2012

PAPER-CUTS August 2012

Here's the third project that you'll be able to make (if you get a wiggle on!!) :
The only added extras here are the ribbon, and a little gold ink... if you like the look of the raffia in the box - I'm afraid you'll have to supply it yourself lol!! Note that the sunray makes an appearance again - this time in the shape of a masked and inked image on the tag.

Ok... I still have 2 entire sheets of patterned paper and a few cute embellishments left... I feel another layout coming on...
Hope you like! xxx

PAPER-CUTS August 2012

Project number 2:

A sweet little card, with a punched out heart on the front - again following the theme of sunbursts.
Again, nothing vital in the way of extras that you'll need for this one - perhaps a little string/twine if you have it?
Hope you like! xxx

Monday 20 August 2012

PAPER-CUTS August 2012

Hello all! First layout share this month:
I thought we'd try something new; there are always new trends creeping into our paper crafting world, so each month, we're going to focus on one - starting with sunbursts!
This layout uses a very obvious sunburst design. I've used a square photo, on a rectangular matt - you may want to do the same.
Over the next couple of days, I'll be creating a few other things with our kit, (all with instructions for you), so keep checking in, but this is our main project this month. As always, everything you need for the layout is in the kit, or for use in our (NEW!) craft room, but if you have any small letter stickers, do bring them along.
Hope you like! xxx
P.S. I have 2 Ikea bags full of goodies that need a new home for a few pennies - and I MEAN a few pennies! So you may want to bring along a little spending money :-)

Thursday 19 July 2012

A Few Little Extras...

I really enjoyed creating a layout with this month's papers from simple Stories. So much so, I've decided to continue creating! The first thing to show is another layout:
I've used another of the journaling cards as a photo mat, and then lots of itty bitty bits and pieces to embellish. Though there will not be instructions for this layout, if you want to create it, there's very little extras you'll need to bring; perhaps some Thickers, a favourite border punch or stamps.
I still have so much left - I decided not to stop there! Here's my next make:
The inspiration for this came from a recent Split Coast Stampers video on You Tube. A very handy note paper holder - how cute! IF we have time, I'd be more than happy to pass on the knowledge of how to create this - you'll need to bring along a piece of acetate if you want a lid, a button, twine, ribbon and some good old printer paper for the note paper. If you want to be mega organised... the printer paper is cut to 3 1/2" square and rounded at the corners (I have to say that the corner rounding was the most tiresome part - feel free to leave it out!).
So... I have a spare few hours today and a fair bit of paper left - who knows what else I'll come up with! Hope you like! xxx

Tuesday 17 July 2012

Scrapaholix July 2012

Hello all, hope you're well! This month, we'll be working with papers from the wonderful Simple Stories Summer Fresh collection; the papers are: Easy Breezy, Yellow Lace/Stitched Lattice and the 4x6 Journaling Card Elements no 2. Along with these papers, we have 2 sheets of dark green card stock, 1 red piece and 1 mustard yellow piece.
So, without further ado... here's what I've created:

This is the layout I'll be giving you instructions for. Of course, as always, there will be extra bits in your kits to complete the layout; the wood flowers, sequins and chipboard hearts. The only thing you'll have to bring along are some cream and red brads, if you wish to use them.
Though there's lots of detail in this layout, the basic structure is simple. There's very little measuring, but you will need your paper trimmer! The photo I've used is 3x3, as I wanted it to fit onto one of the journaling cards as a photo mat. As long as you can cut down your 4x6 photo to a size smaller than it is, that'll be fine.
OK - you have plenty of time to look at the papers online, and choose a photo to coordinate... look forward to seeing you all on Friday/Saturday!
Hope you like! xxx

Tuesday 19 June 2012

Scrapaholix June 2012

I hope everyone's well and looking forward to this month's classes! I loved working with these papers - bright and cheery. Here's what I've come up with:
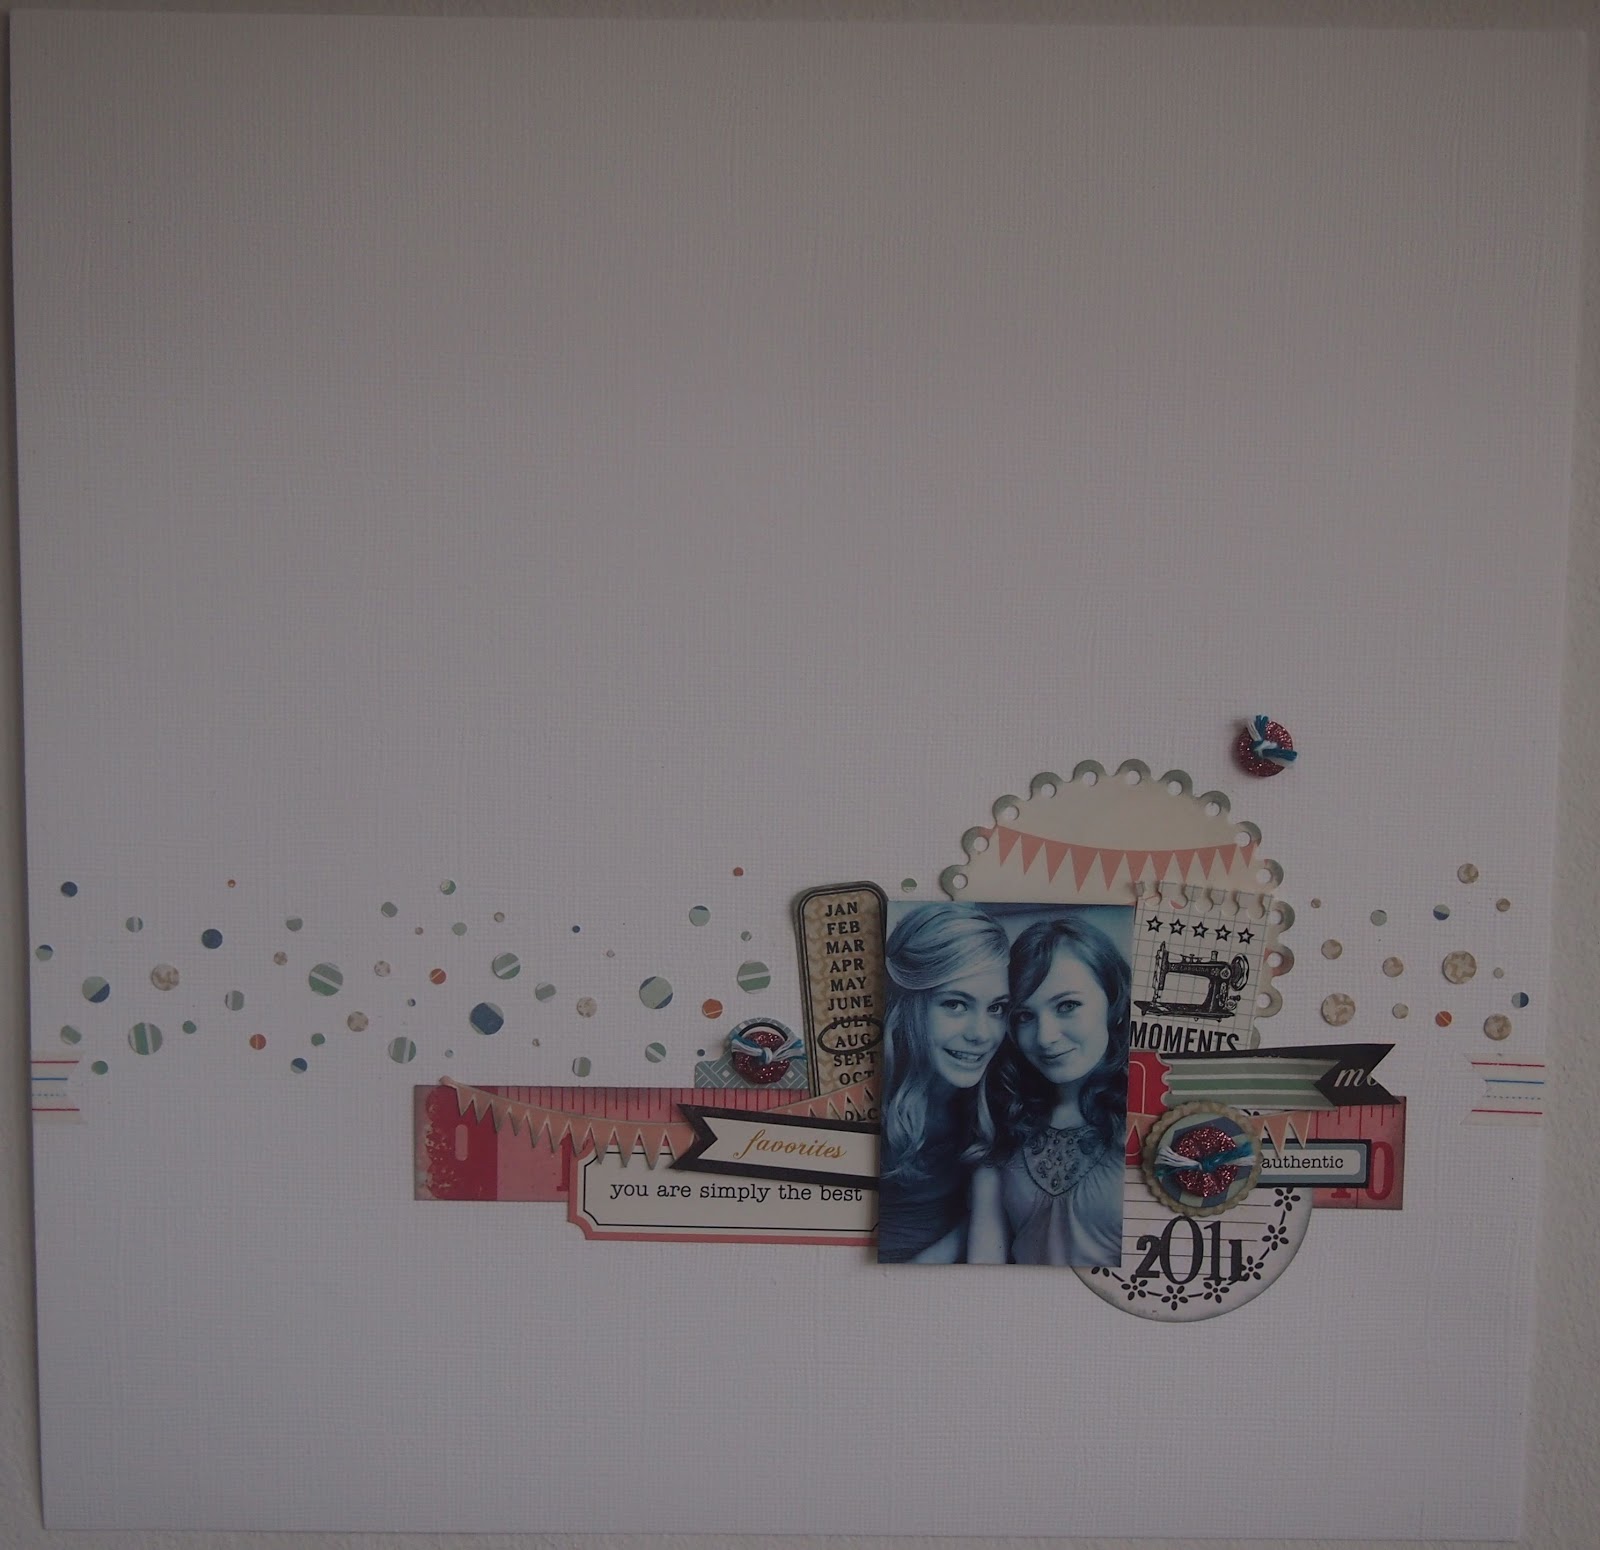
We've been doing a lot of 'white space' layouts recently, so this month I thought we'd change it round a bit and work in a more linear style. Because of the bold graphics on these papers, they are perfect for using as smaller pieces, such as the scallop circles and stars in this layout. I've actually added a horizontal banner to the right of the photo, as I didn't like the empty space there, but had taken the photo beforehand - you'll see on the day!
I'll be providing the polaroid style frame for you - to make sure your photo will work with it, the measurements of the frame are: 3 1/2" x just over 4". Obviously your photo won't be this size, but a standard 4" x 6" photo will do the job, as long as you don't mind cutting off the edges once you've attached the frame. With this in mind, choose a photo that doesn't have detail that you want to keep right at the edge. Does that make sense?!
I'll also be cutting the title for you. IF you have a photo that suits the phrase 'Birthday Celebration' then that would be brilliant lol, even just the Celebration bit, as I've sized it and designed it to fit the layout perfectly. If not, we can think of something else, but be warned it may not be so ornate!
Lastly, a few things you may wish to bring along if you have them at home to speed up the whole sharing process are:
A white gel pen, that will write on black card (worth having in your arsenal anyway if you don't already own one!), a fine tipped glue that dries clear, a 1" scallop circle punch and any star punches you may own. If you have your own sequins (very trendy in paper crafting at the mo) that you'd like to use, please feel free... but I have THOUSANDS!
Looking forward to seeing you all very soon! xxx
P.S of course if you'd prefer to use a punch different from the stars for your sequin bases you can, if you're bringing one from home, just make sure the shape is smaller than 1' so that it doesn't entirely obscure the scallop circle.
Hope you like! xxx

Tuesday 12 June 2012

Yet Another Challenge!

Good morning all! The challenge I was keen to take part in this time is being hosted by Vicki, AKA melovebono on You Tube. Her stipulations are:
1. To use at least 3 photos
2. To journal about your layout
3. To incorporate stamping within your page
Vickie is fab to watch on You Tube - she often gives me a real belly laugh with the things she says! If you'd like to take part in her challenge, you only have a few days - so get on over and take a look at the vid! without further ado, here's my offering:
I really enjoyed creating this one. I'll quickly go over where I've incorporated her 3 rules.
1.I love the look of Instax photos, but NOT the quality of the pics sometimes lol! I purchased an Instax camera, and have had nothing but trouble with it, sooooooo.... I created an Instax frame on my Silhouette and saved it. Now, I can make any photo an Instax lookalike - so much better! 3 photos, as requested.
2. This page is about the garden, and enjoying it for the few days we can here in the UK whilst the sun is shining! The journalling is bottom right.
3. STAMPING! I love it! First, I cut a hexagon background with my silhouette. I stamped all the hexagons before using the negative cut to place them on my page as a base. The second bit of stamping is the cute little pegs holding the photos - sweet! Lastly, I've stamped 'Live in the Moment' around 3 sides of the photos.
The prize??? A fab $30 gift card to an online craft store of your choice! Obviously it has to be one the Vicki can purchase from whilst in the UK - but with t'internet these days that shouldn't post a problem. Hope you like! xxx

Thursday 24 May 2012

May 2012 Scrapaholix

Hello people! Hope this entry finds you well and happy. It's that time again - I'm very much looking forward to seeing all of the Scrapaholix gals this weekend... we always have a laugh and that's what it's all about isn't it?!?
This month, we're working with papers from We R Memory Keepers. I think one of the best things about Scrapaholix, is that we don't get to choose the kits. This means of course, that you are, at times, well out of your comfort zone, trying things you wouldn't necessarily have tried otherwise. Another good thing, right?
So without further ado, here's the sample layout:
Apologies if chickens aren't your thing! If you're coming to class tomorrow or Saturday, there's not a whole lot of extras you need to bring - I think the only item on the page which isn't from the kit, made by me for you or hand made, is the little grey Alpha stickers spelling 'sweet'. Perhaps bring along some scissors for fussy cutting to make your life easier!
I meant to print my two photos 9cm x 13cm (a pre set on the on line printing thingy I use), but actually, they came out smaller than that for some reason! The point I'm badly making, is that if you have two small photos to bring along, fab; if not, I think this layout will work just as well with one 6 x 4 photo, probably landscape being the best.
So, hope you like, see you soon! xxx

Wednesday 2 May 2012

Another Challenge!


I'm really getting into these challenges! This one's from another YouTube favourite, who goes under the name of Coloredsprinklegirl. You can find her challenge here: www.youtube.com/watch?v=9ilkDRILWGU Her challenge was to create something about you... not the dog, or the cat, or your kids, or your significant other, but YOU!
Here's my effort:
Now, before you say anything, yes I know - my kids AND husband are mentioned... but the message that I wanted to get across is that they are part of me - a huge part! The other part of the challenge was to do stuff you wouldn't normally try - well I think I accomplished that! On this (busy) page I've punched the hearts across the page, then used waste from cutting the stars with my Silhouette to back the holes - never done that before; I've doodled around EVERYTHING - never done that before; I've cut into a brand new paper that I've only just received - never EVER done that before!!! Lastly, I've shown my very poor maths skills to the world by saying that 2+4=1, though I've probably done that inadvertently thousands of times before. Of course it doesn't, but if you read the words next to the numbers, it makes sense.
You have until the 5th to take part, and link somewhere that Patty can see it to her Youtube vid - good luck! Hope you like! xxx

Wednesday 18 April 2012

April 2012 Scrapaholix

At last I've got it finished!! This month's kit gave me quite a hard time - I think I was trying too hard to take it in places that it just wouldn't go! Start flexing your fingers ladies... cos there's lots (and I mean LOTS!) of cutting this month - well I guess that's why there's a pair of detail scissors in each kit lol! Here's what I've created:
Now, before I say anything else, I know that some of you are gonna love this kit, and some of you are probably not going to be keen! Remember it's always a GOOD thing to take yourself places you wouldn't normally go!!
I'm pleased with the little banner at the top of the page - inspiration found on the Silhouette blog (thanks Silhouette!). I'll be showing you how to create that when we meet. You'll want to bring along some foam pads, perhaps some deep red cardstock, some twine/string, some tiny alpha's if you have them and some wet glue. The tag blank is a little extra I'll be providing, as is the month banner.
So that's it - hope you like! xxx
P.S. I'm SO glad my Mum doesn't own a computer - I'm not sure she'd appreciate this photo - TeeHee!!

A Challenge!

One of my favourite girls to watch on You Tube is Tracy, otherwise known as Mercytiara. She's a Canadian scrapper with buckets of talent. This month she's hosting a giveaway, with a challenge attached to it. You can see the video here: www.youtube.com/watch?v=CbjiCA8BK-E
And here's what I've created in response to her challenge!
She asked us to create a crafty project, with the subject of scrap booking. There have been some fab responses which you can also see linked to her video.
I chose to create a layout on my new craft studio, which has finally been started! I guess a photo of a knocked out mantlepiece is a strange choice for a lay out on scrap booking, but it really does signify the beginning of a very exciting project!
So go on over and watch Tracy's video, maybe join in? The giveaway is fab!
Hope you like! xxx

Monday 16 April 2012

NEWS FLASH!

Ok - scrap that last post - it seems we're back to the original plan to work with the April kits lol!

Friday 13 April 2012

Advanced Warning for my Scrapaholix Gals!

This month, we were supposed to be working with the detail scissors kit from Scrapaholix, but due to a mess up with suppliers, that's being postponed till next month, and THIS month, it'll be papers from We R Memory Keepers (Good day Sunshine), and brads. I don't have the kits yet, nor a photo, but look the papers up, they look nice! As soon as I have a kit in my sweaty little hands, I'll knock up my layout and post it so you can see what we're going to be playing with - ok? Looking forward to seeing you all! xxx

Thursday 15 March 2012

March 2012 Scrapaholix

OK girls - sorry for the late post, but here's what we're gonna make! I was lucky enough to get a new Silhouette Cameo last week (yay - SO much better at cutting intricate shapes than the Cricut - in my opinion).
The large frame and the banners are made with that. The cute trio of polaroid photos are a Go go stamp - they were really lovely when I posted on UK Scrappers that I HAD to have it, and sent it as a gift - how nice is that??
If you want to use the stamp, you'll have to pick photos that are suitable to cut down so that the image you want  - a face for example, will fit inside the frames - about 1.5" square for the large one, and 1" square for the little ones. I cropped my photos on my computer and printed them out a bit bigger than that to give me room to stick them behind the frames.
If you have no photos you can do that with, no worries - just bring along a photo that'll fit inside a 4" by 3" aperture, or one that you can cut down to that.
Looking forward to our play date, as always.
Hope you like! xxx

Tuesday 14 February 2012

Here's What We're Making!

So, I've had real fun playing with the Ranger Glassine paper - it's a lot more versatile than you would think! I will  be showing you all the wonderful techniques you can use with it... but i got to thinking, enough of the grunge... how about using it in a DIFFERENT way - here's what I came up with:
Instead if tearing, scrunching and crumpling, I tried out lots of different mediums - and most of them worked!
If you have any of the following, you may want to bring them along with you:
Sakura pens, Promarkers, glitter glue, Glossy accents, any stamps that will make a nice embellie for your layout, archival ink pad, and heat gun. As always, it doesn't matter if you have none of the above - just helps to speed up the process!
IF I get time, there may be another layout to share on the day - but I'm not promising anything lol!
See you Friday/Saturday! 
Hope you like! xxx

Thursday 9 February 2012

Scrapaholix February Class

Just a quick post for all my Scrapaholix gals to let you know what papers we're working with this month. As soon as I have them in my sweaty little hands, I'll show you what I've done with them! So, without further ado, this month you shall receive in your kit the following:
1 x Madame Boutique - Corset (double sided)
1 x Madame Boutique - Lingerie (double sided)
2 x Brown
1 x Wheat
1 x Katchina
3 x sheets of Glassine

Hope you like!
xxx

Sunday 15 January 2012

How Flattered am I??!!

So, I had a surprise email last week, from Sarah's Cards, asking me if I'd like to be their guest designer for February's kit. Well... obviously... I had to think about it for like... 2 nano seconds!!!

Other news? I'm thoroughly enjoying creating beautiful things for both Scrap365 (if you haven't purchased it yet you really should!) and Craft Stamper. Ok, so the deadlines leave me feeling a LITTLE under pressure at times - but that is entirely my own fault as I seem to be such a last minute gal!

So perhaps my New Years Resolution should have been to get more organised, and to work ahead of time... yeah... right... like THAT'S ever gonna happen!

I don't feel I can leave you without something nice to look at, so here is a piccie of one of my cats - Cedric (I know I know - we let the kids choose the names!). Hope you like! xxx

Scrapaholix January Class

Ok... so it's obvious that my New Years Resolution was NOT to blog more often... but let's not go there!
This Friday/Saturday is my Scrapaholix class, and this is what we shall be creating:


I've used one of the fabulous sketches in Scrap365, from Marsha Valk, with a tad of individualism thrown into the mix!
I'm trying a new approach with the girls this year - printed instructions with a photo of the layout for them to keep - hope they like it! xxx